
Installing a mirror looks deceptively simple — until you hold a 40-pound glass panel against the wall and realize one wrong move means shattered glass, damaged drywall, or a crooked reflection that bothers you every single day. This mirror installation guide covers every scenario: lightweight bathroom mirrors, heavy LED mirrors, frameless full-length mirrors, and commercial wall-mounted mirrors. Whether you are following this mirror installation guide as a homeowner tackling a weekend DIY project, a contractor installing mirrors for a hotel renovation, or a retailer setting up fitting rooms, these step-by-step instructions help you mount any mirror securely the first time.
This mirror installation guide covers every scenario: lightweight bathroom mirrors, heavy LED mirrors, frameless full-length mirrors, and commercial wall-mounted mirrors. Whether you are a homeowner tackling a weekend DIY project, a contractor installing mirrors for a hotel renovation, or a retailer setting up fitting rooms, these step-by-step instructions help you mount any mirror securely the first time — without calling a professional for every job.
Mirror Installation Guide: Wall Types and Hardware Selection
The most common mirror installation mistake is using the wrong hardware for your wall. Drywall, tile, and concrete each demand different anchors. Using a drywall anchor on a tile wall will crack the tile — often beyond repair. Here is exactly what each wall type requires.
Drywall (Plasterboard / Gypsum Board)
Drywall is the most common residential wall surface but the weakest for hanging heavy objects. A single drywall screw without an anchor holds only 10-15 pounds before it pulls out. For mirrors heavier than 15 pounds during mirror installation, you must anchor into wall studs or use heavy-duty toggle bolts rated for the mirror’s weight.
For lightweight mirrors under 15 pounds, professional-grade adhesive mirror clips screwed directly into studs work well. Between 15 and 50 pounds, toggle bolts or molly bolts with a weight rating at least double the mirror’s weight are the safest choice. For mirrors over 50 pounds — including large LED mirrors and frameless panels — anchoring directly into at least two wall studs is non-negotiable.
Tile Walls
Tile walls present a unique challenge: you must drill through the tile without cracking it, then anchor into the substrate behind it. Use a diamond-tipped drill bit designed for tile and ceramic — never a standard masonry or wood bit, which will skate across the tile surface and crack it. Drill slowly with minimal pressure, and place masking tape over the drill point to prevent the bit from slipping. Once through the tile layer, switch to the appropriate anchor for the substrate material underneath.
For bathroom mirror installation over tile, also apply silicone sealant around the mounting hardware holes. This prevents moisture from penetrating behind the tile and damaging the substrate over time.
Concrete, Brick, and Masonry Walls
Concrete walls are the strongest mounting surface but require specific hardware. A hammer drill with a carbide-tipped masonry bit is essential — a standard drill will burn out its motor before making a single hole in concrete. Use expansion anchors or sleeve anchors rated for the mirror’s weight.
One major advantage during mirror installation on concrete: you can mount mirrors of virtually any weight as long as the anchors are properly sized. For hotel and retail commercial installations, concrete significantly simplifies the mirror installation process and reduces long-term maintenance concerns.
Wall Type Reference Table
| Wall Type | Max Weight (No Stud) | Requires Stud? | Recommended Hardware |
|---|---|---|---|
| Drywall | 15 lbs | Yes (>15 lbs) | Toggle bolts, molly bolts, stud screws |
| Tile over drywall | 15 lbs | Yes (>15 lbs) | Diamond bit + toggle bolts into substrate |
| Plaster and lath | 20 lbs | Yes (>20 lbs) | Toggle bolts with extra-long screws |
| Concrete / brick | Unlimited | No | Expansion anchors, sleeve anchors |
| Wood paneling | 40 lbs | Yes (>40 lbs) | Heavy-duty wood screws with washers |
For authoritative guidance on wall anchoring standards and load-bearing techniques, consult the resources published by This Old House, a trusted authority on home construction and renovation best practices.
Internal Link: Choosing the right mirror before installation is just as important. Start with our wall mounted mirror buying guide to pick the perfect style for your space.
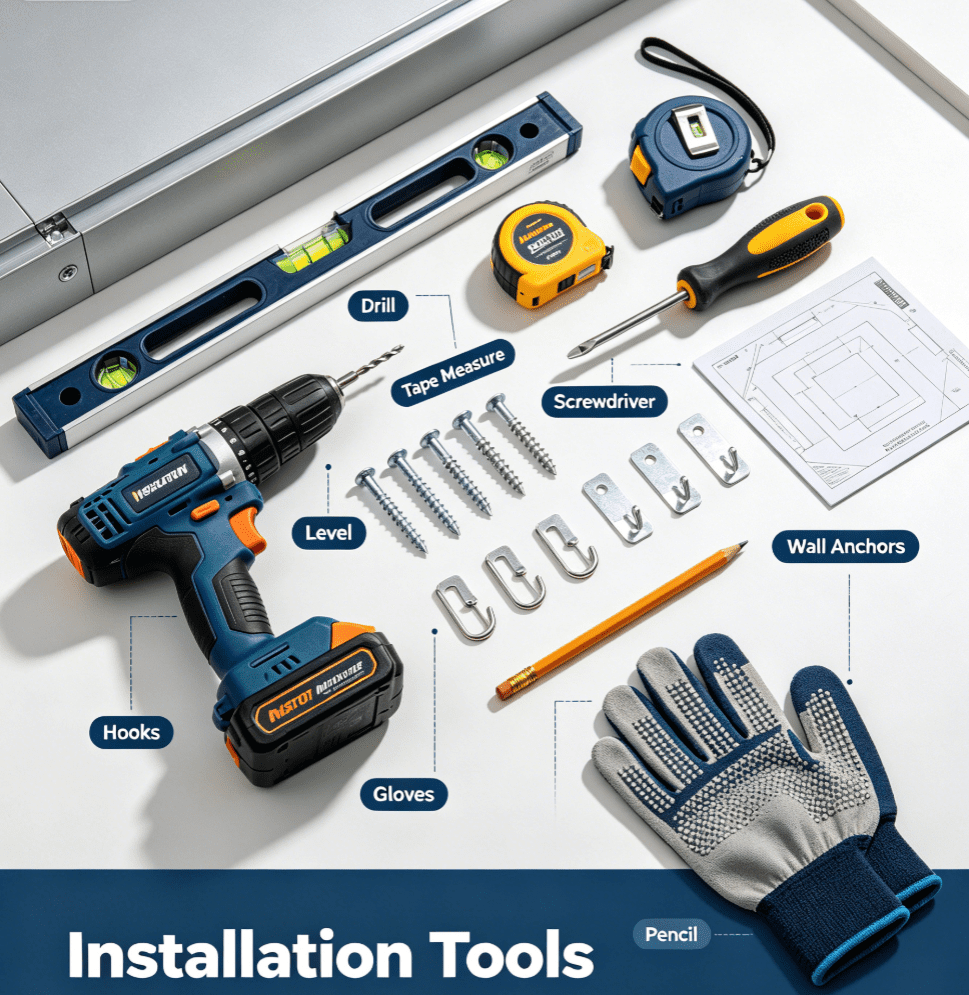
Tool Checklist for Mirror Installation
Gather these tools before you start. Running to the hardware store mid-installation while holding a mirror in place is a recipe for damage.
| Tool | Purpose | Essential? |
|---|---|---|
| Stud finder | Locate wall studs behind drywall | Yes |
| 4-foot level | Ensure mirror is perfectly straight | Yes |
| Measuring tape | Measure placement and spacing | Yes |
| Power drill + drill bits | Drill pilot holes | Yes |
| Diamond-tipped drill bit | Drill through tile safely | Only for tile walls |
| Pencil | Mark hole locations | Yes |
| Mirror clips or z-clips | Secure mirror to wall | Yes |
| Mirror mastic (adhesive) | Alternative to clips for light mirrors | Optional |
| Screwdriver set | Tighten screws | Yes |
| Safety glasses + gloves | Personal protection | Yes |
| Second person | Help lift and position the mirror | Yes (>30 lbs) |
One item deserves special mention: mirror clips versus z-clips. Plastic clips are adequate for mirrors under 15 pounds. For anything heavier, use metal clips or z-clips (also called French cleats) that interlock for a stronger, more stable hold. Z-clips are the professional standard for large frameless mirrors because they distribute weight evenly across the entire mirror width — a critical detail for a successful mirror installation.
How to Install a Mirror: 6 Safe Steps
Step 1: Choose the Right Location
Before touching any tools, determine exactly where the mirror will hang. For bathroom mirrors above a vanity, the standard height places the bottom edge 5-10 inches above the countertop, centered horizontally above the sink. For full-length bedroom or dressing room wall mirrors, position the bottom edge 12-18 inches from the floor so the average user sees their full body.
Hold the mirror against the wall at the intended position and have someone mark the top corners lightly with a pencil. Step back and view it from multiple angles in the room. Check that light fixtures, door swings, and furniture do not partially block the reflection.
For professional bathroom planning standards covering mirror placement and accessibility, the National Kitchen & Bath Association (NKBA) publishes detailed guidelines for residential and commercial bathroom design.
Step 2: Locate Studs and Mark Mounting Points
Use a stud finder to locate all studs behind the intended mirror area. Mark each stud center with a vertical pencil line. If your mirror spans at least two studs, you have a solid foundation for mirror installation. If it aligns with only one stud, use toggle bolts on the unsupported side.
For mirrors using clips or z-clips, mark each clip position on the wall. Clips along the bottom edge bear the weight; clips on top and sides hold the mirror flush. Space clips no more than 24 inches apart — closer spacing is safer for heavy mirrors.
Step 3: Prepare the Wall Surface
The wall surface must be clean, dry, and flat for a successful mirror installation. Wipe the area with a dry cloth to remove dust. For tile walls, clean away soap residue that could interfere with adhesive or sealant. If the wall has significant unevenness — dips deeper than 1/8 inch — apply a skim coat of joint compound and sand it smooth. An uneven mounting surface puts stress on the mirror glass and can cause cracking over time.
Step 4: Drill Pilot Holes
Drill pilot holes at each marked clip or anchor point. The bit should be slightly smaller than the screw or anchor diameter — typically 1/8 inch for standard screws — to prevent the wall material from splitting or cracking.
For tile walls: place masking tape over the drill point, use a diamond-tipped bit at low speed with light pressure, and stop immediately once you break through the tile layer. For concrete: use a hammer drill with a masonry bit, and blow dust out of each hole before inserting the anchor.
Step 5: Install Anchors and Mounting Hardware
Insert wall anchors into the pilot holes. Toggle bolts require the wings to be folded flat during insertion — they spring open once through the wall. Molly bolts expand behind the wall as you tighten. Tap expansion anchors flush with the wall surface.
Install the bottom clips or the wall-side half of the z-clips first. These bear the mirror’s weight, so they must be perfectly level. Use a 4-foot level across all bottom clips and adjust before fully tightening the screws. A misaligned bottom row means the entire mirror installation will end up crooked, and fixing it requires new holes.
Step 6: Mount the Mirror
For large mirrors over 30 pounds, this is firmly a two-person job. One person lifts and positions the mirror while the other guides it into the clips and checks alignment. Lift with your legs, not your back — mirrors are awkwardly shaped and can strain muscles if lifted incorrectly.
For clip-mounted mirrors: set the bottom edge into the bottom clips first, then tilt the mirror upright and secure the top and side clips. Tighten screws gently — overtightening can crack the glass or strip the anchor. For z-clip mirrors: lift the mirror so the mirror-side z-clip sits slightly above the wall-side z-clip, then lower it until the interlocking channels engage with a satisfying click.
After mounting, check alignment with the level one final time. Make small adjustments by loosening top clips slightly and shifting the mirror. Once satisfied, tighten all screws to their final position and wipe away pencil marks.
Internal Link: For mirrors in commercial settings with unique shape or size requirements, refer to our guide on custom mirror solutions for hotels and commercial projects.
Special Considerations by Mirror Type
LED and Lighted Mirrors
LED mirrors add one critical extra step to the mirror installation process: electrical connection. Most LED mirrors include a driver or junction box that must be wired to your home’s electrical system. Unless you are an experienced DIY electrician, hire a licensed professional for this step — a poor connection behind a bathroom mirror in a high-moisture environment is both a shock and fire hazard.
If your LED mirror uses a plug-in power supply, ensure the cord reaches a GFCI-protected outlet, which is required by building code for all bathroom outlets. Test the touch sensor or motion sensor switch before finalizing the mirror position, as the wire routing may affect your mounting point choices.
Before drilling any holes for an LED mirror, verify there are no electrical wires or plumbing pipes behind the wall using a multi-scanner stud finder. Drilling into a live wire hidden behind drywall causes serious injury and expensive repairs.
Frameless Mirrors
Frameless mirrors are unforgiving during mirror installation: every edge is exposed, and even a tiny chip is immediately visible. Use felt pads or rubber spacers between the mirror edge and clips to prevent glass-to-metal contact. For adhesive-mounted frameless mirrors, apply mirror mastic in vertical strips spaced 10-12 inches apart, leaving small gaps between strips for air circulation. This prevents moisture buildup that degrades the reflective silver backing over time.
Heavy Oversized Mirrors (Over 75 Pounds)
For mirrors exceeding 75 pounds, z-clips are the only acceptable mounting method. Install the wall-side z-clip into at least two studs using 3-inch construction screws rated for the load. The mirror-side z-clip should run the full width of the mirror back and be attached with construction adhesive as well as mechanical fasteners. For mirrors over 100 pounds in commercial settings, consult a structural engineer or use a professional glazing contractor — this is no longer a DIY mirror installation.
6 Common Mirror Installation Mistakes to Avoid
- Skipping the stud finder: The single most common cause of mirror installation failure. A mirror mounted only in drywall will eventually pull out, especially in humid bathrooms where drywall weakens over time.
- Using the wrong adhesive: Standard construction adhesive contains chemicals that eat through the mirror’s reflective silver backing, creating permanent dark spots. Always use mirror-specific mastic labeled “mirror-safe” or “neutral cure.”
- Ignoring wall unevenness: Even a 1/8-inch dip in the wall creates stress points on the glass. Over months of temperature cycling, these stress points can cause the mirror to crack without warning.
- Overtightening clips: Mirror glass does not flex. A clip that is too tight creates a pressure point that eventually cracks the glass. Snug is enough — never crank clips down with force.
- Installing alone: A mirror that falls during mirror installation shatters into thousands of sharp shards. For any mirror above 30 pounds, the second person is a safety requirement, not a suggestion.
- Forgetting to test the position: Always hold the mirror against the wall and check the reflection before drilling. A mirror installed too high shows only foreheads; too low shows only chests. Once holes are drilled, changing position means patching, sanding, and repainting the wall.
When to Hire a Professional
DIY mirror installation saves money and is achievable for most bathroom and bedroom mirrors under 50 pounds on drywall. However, hire a professional when:
- The mirror exceeds 75 pounds or requires wall reinforcement
- You are mounting onto tile, stone, or brick without prior experience
- The mirror is LED and requires hardwired electrical work
- You are installing mirrors in a commercial space with building code and liability requirements
- The mirror is an antique, custom-made, or irreplaceable piece
Professional installation typically costs $100-$300 per mirror depending on size, weight, and wall complexity. For hotel renovations, retail fit-outs, and commercial projects, professional mirror installation is factored into the project budget and provides the assurance of licensed, insured workmanship.
At Wosen Mirror, we manufacture mirrors for residential, commercial, and hospitality projects worldwide. Our LED bathroom mirrors, wall-mounted mirrors, and custom vanity mirrors ship with detailed installation instructions and the recommended mounting hardware for each mirror type and weight class. For bulk orders and commercial projects, we provide full installation specification sheets for contractor teams.
For international buyers sourcing mirrors for large-scale installations, read our guide on how to import mirrors from China — covering shipping logistics, customs, and post-delivery installation recommendations.
Browse Products: View our full collection of LED bathroom mirrors and wall mounted mirrors — designed for secure, straightforward installation on any wall type.

